I’ve been looking to get to grips with EAGLE PCB layout software and this was a great project to start with.
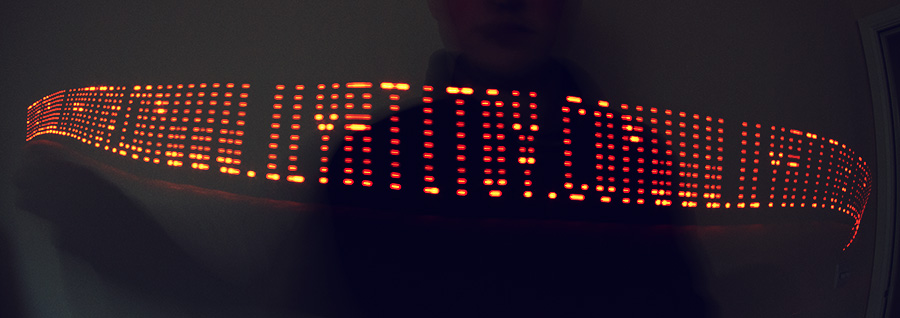
The idea behind persistence of vision is that an array of led pixels blinks out an image line by line, so when you move it the lines get stacked up one after another. If you can do this fast enough out retinas will see an after-image of multiple lines at once and we’ll be able to make out the image.

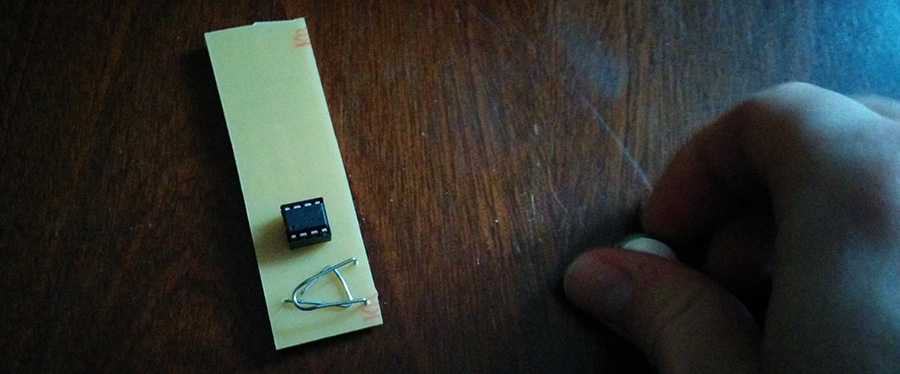
I decided to make a 10 pixel array and as there are less than 10 pins on the Attiny I decided to use Charlieplex layout to drive all of them.
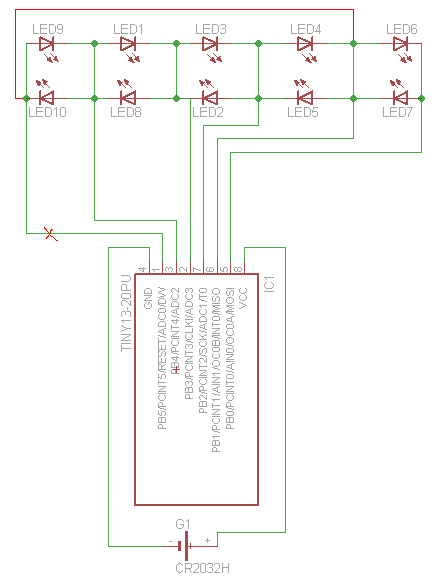
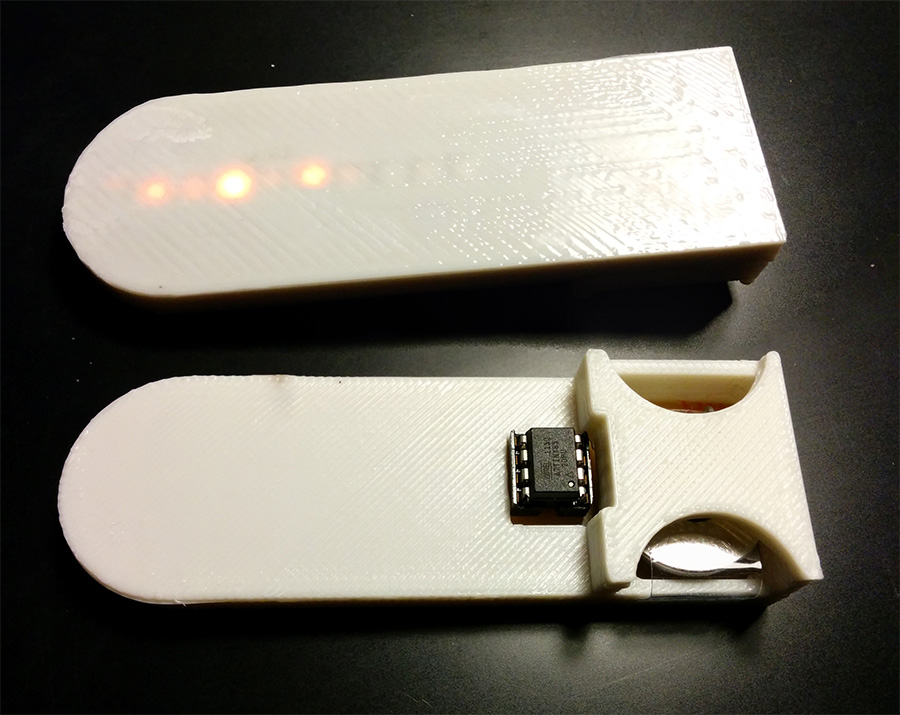
I’ve later had to cut the track to pin one and re-wire it to pin 6 as if I used the reset pin I would no longer be able to re-program the chip. Luckily we can drive up to 20 charlieplexed LEDs with 5 pins so we’ll just take care of this in the program.
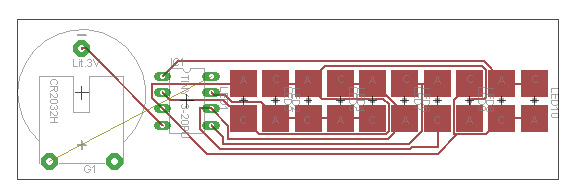
I exported the board from EAGLE as a nonochrome image and laser-printed on a page from a magazine.
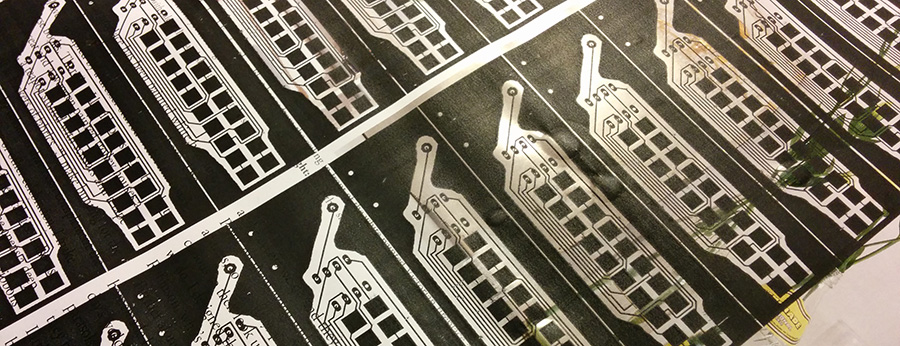
The printout is then pressed against a sheet of copper clad board and ironed over to make the tone stick to the copper. The board is then washed free of paper, cut and submersed in ferric chloride to etch away the areas not covered by the toner. PCB is drilled, covered with solder paste and the components are soldered on.
We then want a program that will very quickly pulse out our image bearing in mind that only one LED can be lit at any given moment. We’ll be using assembler port commands as digitalWrite would be too slow for what we are doing. To flash the program to Attiny I’ll be using arduino as isp, see high-low tech group page for more details
Here are the commands for each individual LED to light up.
/*
  PORTB = B00001000; DDRB = B00011000; //1
  PORTB = B00001000; DDRB = B00001100; //2
  PORTB = B00000100; DDRB = B00001100; //3
  PORTB = B00000010; DDRB = B00000110; //4
  PORTB = B00000100; DDRB = B00000110; //5
  PORTB = B00000001; DDRB = B00000011; //6
  PORTB = B00000010; DDRB = B00000011; //7
  PORTB = B00010000; DDRB = B00011000; //8
  PORTB = B00010000; DDRB = B00010010; //9
  PORTB = B00000010; DDRB = B00010010; //10
*/
The PORTB sets pins high or low and the DDRB sets the active pins as outputs and inactive pins as inputs to prevent any random leds lighting up. See how we can change state of multiple pins with a single call.
I made two functions to make the control easier. 10 bits of data are passed in 2 variables and if the bit in a variable is high the corresponding led will be lit.
Here is the complete program:
void setup() {
  pinMode(0, OUTPUT);
  pinMode(1, OUTPUT);
  pinMode(2, OUTPUT);
  pinMode(3, OUTPUT);
  pinMode(4, OUTPUT);
}

void loop() {
    for (int i = 0; i<= 16000; i++){showRow(B00000001,B00000000);} // light up led 1 16000 times
    for (int i = 0; i<= 16000; i++){showRow(B00000010,B00000000);} // light up led 2 16000 times
    for (int i = 0; i<= 16000; i++){showRow(B00000100,B00000000);} // light up led 3 16000 times
    for (int i = 0; i<= 16000; i++){showRow(B00001000,B00000000);} // light up led 4 16000 times
    for (int i = 0; i<= 16000; i++){showRow(B00010000,B00000000);} // light up led 5 16000 times
    for (int i = 0; i<= 16000; i++){showRow(B00100000,B00000000);} // light up led 6 16000 times
    for (int i = 0; i<= 16000; i++){showRow(B01000000,B00000000);} // light up led 7 16000 times
    for (int i = 0; i<= 16000; i++){showRow(B10000000,B00000000);} // light up led 8 16000 times
    for (int i = 0; i<= 16000; i++){showRow(B00000000,B00000001);} // light up led 9 16000 times
    for (int i = 0; i<= 16000; i++){showRow(B00000000,B00000010);} // light up led 10 16000 times
}

void showRow(int bi, int bi2){
  if (bi2&B00000001){PORTB = B00010000; DDRB = B00010010;} //9
  if (bi2&B00000010){PORTB = B00000010; DDRB = B00010010;} //10
  if (bi&B10000000){PORTB = B00010000; DDRB = B00011000;} //8
  if (bi&B01000000){PORTB = B00000010; DDRB = B00000011;} //7
  if (bi&B00100000){PORTB = B00000001; DDRB = B00000011;} //6
  if (bi&B00010000){PORTB = B00000100; DDRB = B00000110;} //5
  if (bi&B00001000){PORTB = B00000010; DDRB = B00000110;} //4
  if (bi&B00000100){PORTB = B00000100; DDRB = B00001100;} //3
  if (bi&B00000010){PORTB = B00001000; DDRB = B00001100;} //2
  if (bi&B00000001){PORTB = B00001000; DDRB = B00011000;} //1
}

void dimAll(){
   PORTB = B00000000; DDRB = B00000000; // dim all
}
What the above does is the switch-on iteration which lights each led in sequence you see in the video as I put the battery in.
So our POV is working, lets write some text. It would be a pain to manually create text string from vertical lines of pixels so I wrote a php program to take care of that. Feel free to use it, it converts text into a 10 bit matrix:
http://ilyatitov.com/pov.php?string=MESSAGE
Make sure to go to page source to grab the code.
Download the case from thingiverse: http://www.thingiverse.com/thing:247795
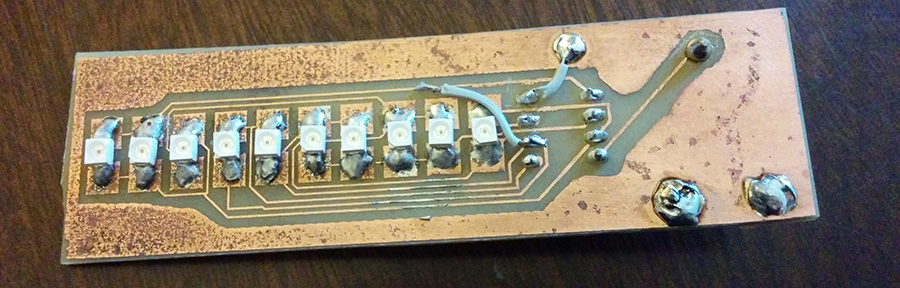
Parts:
- Single sided pcb
- 10x cpld2 leds
- Attiny85
- DIP8 socket
- CR2032 battery
- Paperclip
- Some wire
php program to convert text to bit matrix
$letters['A'] = array('1111111111','0000010001','0000010001','0000010001','1111111111');
$letters['B'] = array('1111111111','1000010001','0100010010','0100010010','0111101110');
$letters['C'] = array('0111111110','1000000001','1000000001','1000000001','0100000010');
$letters['D'] = array('1111111111','1000000001','1000000001','0100000010','0111111110');
$letters['E'] = array('1111111111','1000010001','1000010001','1000000001');
$letters['F'] = array('1111111111','1000010001','0000010001','0000000001');
$letters['G'] = array('1111111111','1000000001','1000010001','1000010001','0100010001');
$letters['H'] = array('1111111111','0000010000','0000010000','1111111111');
$letters['I'] = array('0000000000','1111111111','0000000000');
$letters['J'] = array('0110000000','1001000001','1000000001','1111111111');
$letters['K'] = array('1111111111','0000110000','0000101000','0111000110','1000000001');
$letters['L'] = array('1111111111','1000000000','1000000000','1000000000');
$letters['M'] = array('1111111111','0000000110','0000001000','0000001100','1111111111');
$letters['N'] = array('1111111111','0000001110','0001110000','1110000000','1111111111');
$letters['O'] = array('0111111110','1000000001','1000000001','0111111110');
$letters['P'] = array('1111111111','0000010001','0000001110');
$letters['Q'] = array('0111111110','1010000001','1100000001','0111111110','1000000000');
$letters['R'] = array('1111111111','0000010001','0000101001','0111001001','1000000110');
$letters['S'] = array('0100011110','1000010001','1000010001','0111100010');
$letters['T'] = array('0000000001','0000000001','1111111111','0000000001','0000000001');
$letters['U'] = array('0111111111','1000000000','1000000000','0111111111');
$letters['V'] = array('0000001111','0001110000','1110000000','0001110000','0000001111');
$letters['W'] = array('0111111111','1000000000','0111000000','1000000000','1111111111');
$letters['X'] = array('1110000111','0011001100','0000110000','0011001100','1110000111');
$letters['Y'] = array('0000001111','0000010000','1111100000','0000010000','0000001111');
$letters['Z'] = array('1000000001','1000000111','1000011001','1001100001','1110000001');
$letters['.'] = array('1000000000');
$letters[')'] = array('0001111000','0111111110','1110111110','1101110110','1101111111','1101111111','1101110110','1110111110','0111111110','0011111000');
$letters[' '] = array('0000000000');
$letters['!'] = array('1001111111');
$type = str_split(preg_replace('/[^A-Z!\. )]/','',strtoupper($_GET['string'])));
//print_r($type);
foreach ($type as $key => $value){
	foreach ($letters[$value] as $key2 => $value2){
		echo '      for (int i = 0; i<= times; i++){showRow(B'.$value2{7}.$value2{6}.$value2{5}.$value2{4}.$value2{3}.$value2{2}.$value2{1}.$value2{0}.',B000000'.$value2{9}.$value2{8}.');}'."\n";

	}
	echo "      dimAll();
      delay(5);\n";
}
Great work…
I want to understand more on Charlieplex
Could you please share the circuit diagram, Many of your images have been moved or deleted
ok… so i built this circuit, and used your exact code posted above the video, but i’m getting something completely different. It appears that 2 LED’s are flashing at a time, but not in sequential order, and not really all that fast.
I’m using an attiny85 with internal 8mhz clock
Hello, have you amended the board so the trace that was to the pin 1 on the diagram is wired to pin 6? (See bypass wire on the photo)
I have indeed. I’ve uploaded the eagle file here:
https://mega.nz/#!sIplAbjQ!fxP1CR-tn9wGanq93agk0pMf-TtwJBr-c3ikFa2XkZA
Can you get all the LEDs to light up one by one using your own sketch?
On your PCB board you have shorted pin6 and pin1 of ATtiny85 whereas in circuit diagram you havent so which one is correct??
The pcb was wrong, I had to cut the trace and run the wire
have you used attiny85 or attiny13 ?
Attiny85